Landmarking: 9/2/11
I wanted to try a putty medium technique described by Ted Spurgeon, an artist who, like me, likes to learn from the masters. I love to experiment, but Tad is much more scientific than I am. He's been doing years of research, he's read all the original source materials he can find on paintmaking, and and he's found some very interesting things.
The putty medium as Tad uses it is a way to extend pigment, add body to the paint, and create a ground to set up a next layer of oil glaze. Beautiful concept, and he does wonderful things with it.
I decided to try his putty medium, and I dove right in and made several huge mistakes right off. I used more than twice as much oil as his recipe called for, and tripled the egg whites to make up for it! Then I had to dump in all the marble dust I had on hand, which wasn't enough to save the mess I'd made. It was lumpish like oatmeal and wept oil. I was discouraged. I sealed the thing into an apothecary jar and headed for bed.
I woke up in the middle of the night and remembered the quark I still had in the refrigerator. Quark is a soft homemade cheese made with skim milk. I learned to make it when I experimented with quark and oil glaze. I didn't like the effect of the glaze that much, but I added a new staple to my diet! Low in fat and sodium, high in protien. . . extremely versatile. So I've been making it ever since. And I knew that stuff soaks up oil; I'd seen it!
The next day I was off work, I added some borax and skim milk to the thing. I use this emulsion to solve all kinds of problems: it's like a glue that works on multiple levels; it breaks down oil, the casien binds with just about anything, and it sets up a base surface that any additional acid layers will adhere to. Then I added an equal amount of quark to the mixture and stirred in some additional marble dust.
Instantly, the lump stirred up as smooth as cream. In fact, it was a little like whipped cream, probably because of all those egg whites!
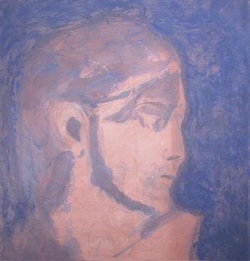
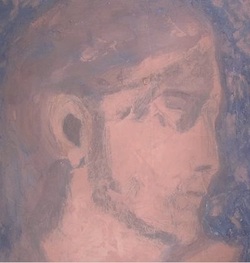
I added pigment to bring the putty to a terra cotta color and slathered it on the new poplar panel. I was thrilled at the way it was acting. It set up almost immediately. The rigid surface held slight variations in depth, just a bit of relief.
But look at the qualities of the ingredients I'd used:
Oil; moistening (but walnut oil dries quickly!)
Egg Whites; drying
Marble Dust; drying
Quark; drying
Borax; drying
Skim Milk; drying
You get my drift. This stuff dries quickly, and it will dry any oil you apply to it quickly, too. In fact, the only problem I've had with it is that it dried my wood panel to the point of producing slight cracks at the joints. I'll have to come up with a workaround, because this stuff is amazing!
The first advantage I found to working with the putty was that I was able to ident the surface. Hallelujah! One of my greatest challenges in portraiture is trying to keep track of exactly where all the features belong. Millimeters make a difference with portraits. Every stroke of the brush, you risk slipping and relocating a nostril, lip, eyebrow. . . anything, everything can be covered up and disappear under that paint at any moment. And relocating the features, even slightly, can bring a monster or an alien or an obsure movie star to life just when you don't want to see them!
So a surface that can be marked permanently, by say, scratching a dip into the surface. . . has possibilites. If you do any printmaking, you will know what I'm talking about.
First, I drew on the surface with pencil. Next time, I think I'll use pastels instead. This surface is like a chalkboard. The pastel layer can be blended into the painting at a later phase.
Then I landmarked the putty surface by scratching in with a sculpture tool at the darkest points of the face: the eyebrow, nostril, the inside of the mouth, the ear. Then I painted my darkest darks into those areas. I did a little overlapping into light areas, but it was simple enough to sand the areas that were supposed to be light, and voila! The fine line between dark and light was re-established, thanks to the indenations in the putty!
The putty medium as Tad uses it is a way to extend pigment, add body to the paint, and create a ground to set up a next layer of oil glaze. Beautiful concept, and he does wonderful things with it.
I decided to try his putty medium, and I dove right in and made several huge mistakes right off. I used more than twice as much oil as his recipe called for, and tripled the egg whites to make up for it! Then I had to dump in all the marble dust I had on hand, which wasn't enough to save the mess I'd made. It was lumpish like oatmeal and wept oil. I was discouraged. I sealed the thing into an apothecary jar and headed for bed.
I woke up in the middle of the night and remembered the quark I still had in the refrigerator. Quark is a soft homemade cheese made with skim milk. I learned to make it when I experimented with quark and oil glaze. I didn't like the effect of the glaze that much, but I added a new staple to my diet! Low in fat and sodium, high in protien. . . extremely versatile. So I've been making it ever since. And I knew that stuff soaks up oil; I'd seen it!
The next day I was off work, I added some borax and skim milk to the thing. I use this emulsion to solve all kinds of problems: it's like a glue that works on multiple levels; it breaks down oil, the casien binds with just about anything, and it sets up a base surface that any additional acid layers will adhere to. Then I added an equal amount of quark to the mixture and stirred in some additional marble dust.
Instantly, the lump stirred up as smooth as cream. In fact, it was a little like whipped cream, probably because of all those egg whites!
I added pigment to bring the putty to a terra cotta color and slathered it on the new poplar panel. I was thrilled at the way it was acting. It set up almost immediately. The rigid surface held slight variations in depth, just a bit of relief.
But look at the qualities of the ingredients I'd used:
Oil; moistening (but walnut oil dries quickly!)
Egg Whites; drying
Marble Dust; drying
Quark; drying
Borax; drying
Skim Milk; drying
You get my drift. This stuff dries quickly, and it will dry any oil you apply to it quickly, too. In fact, the only problem I've had with it is that it dried my wood panel to the point of producing slight cracks at the joints. I'll have to come up with a workaround, because this stuff is amazing!
The first advantage I found to working with the putty was that I was able to ident the surface. Hallelujah! One of my greatest challenges in portraiture is trying to keep track of exactly where all the features belong. Millimeters make a difference with portraits. Every stroke of the brush, you risk slipping and relocating a nostril, lip, eyebrow. . . anything, everything can be covered up and disappear under that paint at any moment. And relocating the features, even slightly, can bring a monster or an alien or an obsure movie star to life just when you don't want to see them!
So a surface that can be marked permanently, by say, scratching a dip into the surface. . . has possibilites. If you do any printmaking, you will know what I'm talking about.
First, I drew on the surface with pencil. Next time, I think I'll use pastels instead. This surface is like a chalkboard. The pastel layer can be blended into the painting at a later phase.
Then I landmarked the putty surface by scratching in with a sculpture tool at the darkest points of the face: the eyebrow, nostril, the inside of the mouth, the ear. Then I painted my darkest darks into those areas. I did a little overlapping into light areas, but it was simple enough to sand the areas that were supposed to be light, and voila! The fine line between dark and light was re-established, thanks to the indenations in the putty!
This is what happened next. . .click on the image above for an explanation.