Beeswax Paint
Beeswax paint has two simple ingredients: beeswax, and pigment. The beeswax binds the pigment and it's an excellent preservative! It has a translucent quality that captures light and makes a painting glow from within. You can also use oil paint on top of beeswax; it blends beautifully and you can get some effects that can't be duplicated with oil paint alone. Beeswax paint is applied heated; in Cincinnati, that's considered a good winter activity. Binding the paint to the surface process involves heat, too. Safety precaution: wax is very flammable. Avoid heating beeswax over an open flame.
A wooden panel is a good surface to work on. Canvas is too flexible and will cause the beeswax to crack.
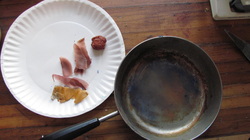
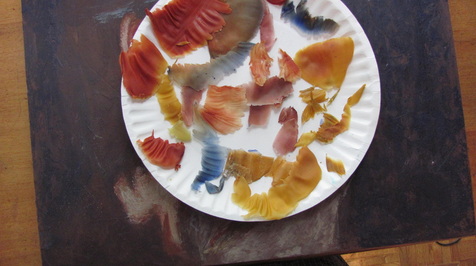
I only own a few cherished brushes, and I won't let them near beeswax. We have ways of working around brushes. . . here's my little wax skillet. I make the paint very shallow, sprinkling a few grains of pigment into the molten wax and swirling them together in the pan. I like to use bicolor wax; the one in the pan is made with an apricot ochre and a lavendar ochre. When cooled solid, I scrape shards out of the pan with a palette knife and then I apply them to the surface of the painting. I break up the shards with my fingers into the shapes I want for the painting. I place them on the surface of the painting like a mosaic. I move them around until I like the effect. I can tack them down more securely by putting a drop of oil beneath, if needed.
A wooden panel is a good surface to work on. Canvas is too flexible and will cause the beeswax to crack.
I only own a few cherished brushes, and I won't let them near beeswax. We have ways of working around brushes. . . here's my little wax skillet. I make the paint very shallow, sprinkling a few grains of pigment into the molten wax and swirling them together in the pan. I like to use bicolor wax; the one in the pan is made with an apricot ochre and a lavendar ochre. When cooled solid, I scrape shards out of the pan with a palette knife and then I apply them to the surface of the painting. I break up the shards with my fingers into the shapes I want for the painting. I place them on the surface of the painting like a mosaic. I move them around until I like the effect. I can tack them down more securely by putting a drop of oil beneath, if needed.
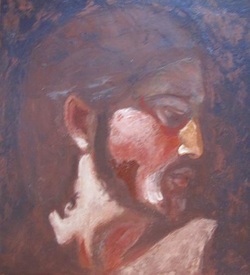
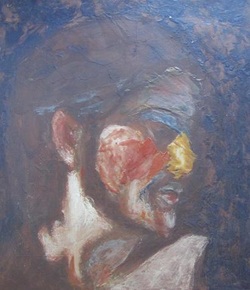
When I was working on copying Caravaggio's Head of Christ from the Calling of Matthew, I made a mistake--not too surprising! I used two different formulas for putty medium, and, well, the emulsion broke down. I had hoped to try beeswax on the surface anyway, so here was a good excuse. Instead of scraping the surface down to bare wood and starting over, I let it dry as best I could, slapped on a layer of cure-all borax and skim emulsion, let it dry, then built up a layer of beeswax to form a new ground over the "oops" layer I'd made out of the wrong medium. The interim phase looked like this (kind of an awkward phase, but the whole point of these photos is to demonstrate what art in the making looks like, awkwardness and all. . .)
Next I had to fix the beeswax paint to the surface. This requires heat. I heat my palatte knife against an ordinary household iron (which as a result of being used for this purpose has a lot of colored wax on it, so now it's no longer an ordinary household iron. . .) and hold the knife against the wax until it melts. That's pretty much it. I sand the wax once it's cool if I think it's too bumpy. Then I apply putty over the beeswax areas, or oil paint, or both. The whites used with putty techniques are translucent. Unlike using Titanium White from the art supply store shelf, the marble dust which whitens the putty medium will permit light through, sustaining the light-transmitting quality of the beeswax layer.
I was integrating a single beeswax layer (so far!) into a piece that uses several types of layers. So I sanded the wax, cut it off the areas where it did not need to be, and painted on some borax and skim emulsion to ready the beeswax surface for the next putty layer.
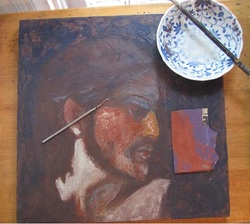
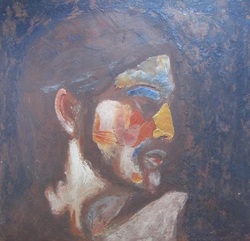
Here's how the painting looks with one layer of putty applied over the beeswax. The next layer will be oil glaze and oil paint over putty and beeswax.